Okay, so you’ve probably been staring at your Dirt Devil vacuum cleaner thinking, “I really gotta get inside this thing,” but the whole process looks like some kind of alien tech puzzle, right? I totally get it, and yeah, it’s kinda frustrating when you just want to clean out that gunk without breaking your vacuum. Taking apart a Dirt Devil vacuum cleaner isn’t rocket science, but if you don’t know the little tricks, you might spend hours wrestling with screws that don’t wanna budge or panels that seem glued together by witchcraft. I’m gonna walk you through this in a way that’s actually… usable. No fluff, no overly technical jargon, just the stuff you need.
Why You Might Want to Take Apart Your Dirt Devil
There’s a ton of reasons you’d wanna do this. Maybe the brush roll is jammed with hair and string, maybe the suction’s gone weak, or maybe there’s some mysterious rattling sound that’s driving you nuts. People often just buy a new vacuum thinking it’s cheaper or easier, but honestly, a lotta problems are just dust and debris stuck in the motor or hose. According to Consumer Reports, over 60% of vacuum issues are basically simple blockages or minor brush issues. So taking apart your Dirt Devil vacuum cleaner might actually save you a ton of money.
Also, there’s this weird satisfaction in actually fixing something yourself. You know that feeling when you finally pop open a device and all the inner bits just click into place? Yeah, it’s kinda addictive. And let’s be real, Dirt Devils aren’t exactly delicate porcelain—they’re built to take a bit of handling, which is lucky for us.
Tools You’ll Probably Need
Before you dive in, lemme just save you some time by saying this: don’t try to do it with your fingernails or a butter knife. Here’s the realistic toolkit:
- A Phillips-head screwdriver (medium size usually does it)
- Flat-head screwdriver (for prying panels)
- Needle-nose pliers (for sneaky clips and wires)
- Tweezers (for hair and dust in tiny crevices)
- A small bowl (to keep screws from vanishing into the void)
Some models might have torx screws instead of regular Phillips, so check the bottom of your vacuum before you start yanking things apart. And yeah, it’s kinda obvious, but unplug the vacuum first. You’d be amazed how many people forget that step and end up in a tiny panic.
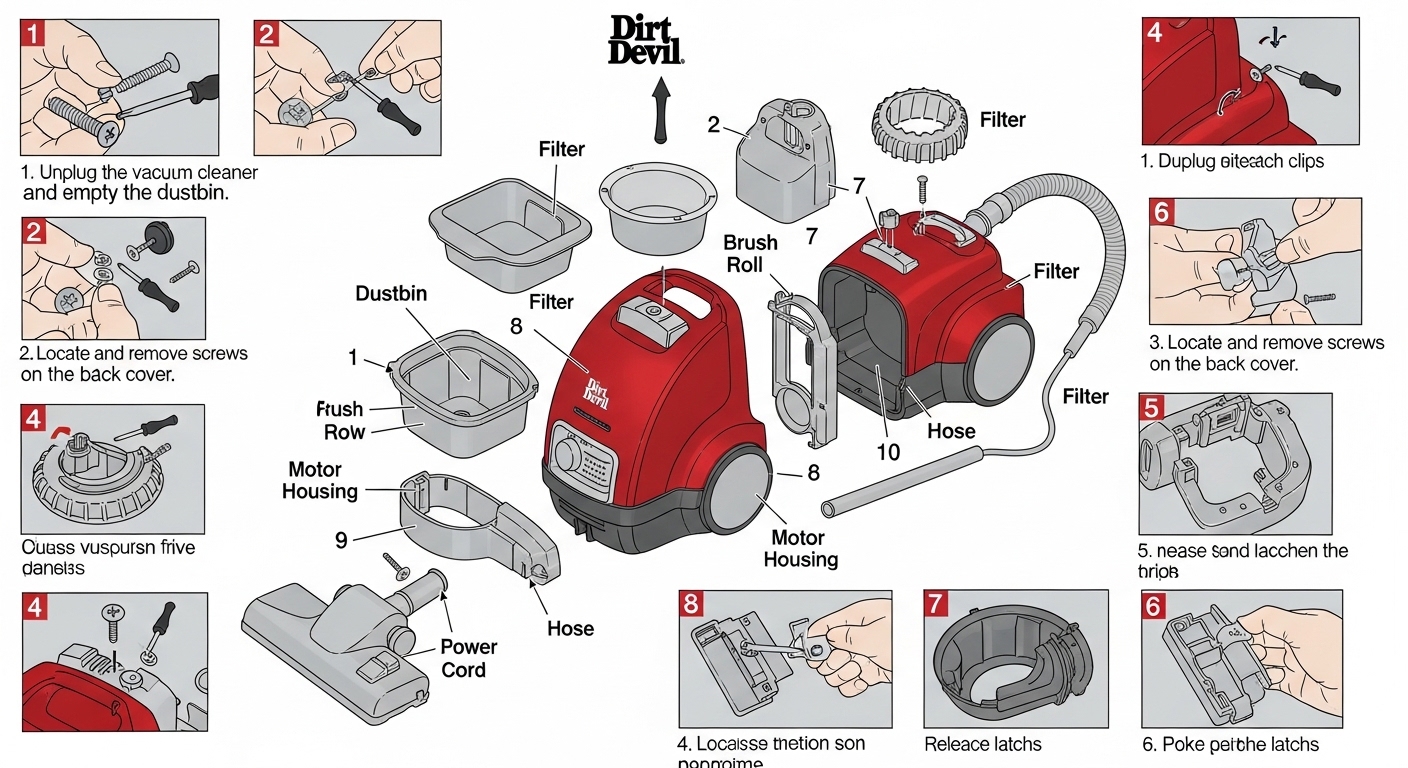
Step-by-Step: How to Take Apart Your Dirt Devil
Alright, now we get to the messy part. I’m gonna break it down like you’re sitting on the floor, bits everywhere, coffee on the side, kinda casual but methodical.
Step 1: Remove the Dust Cup or Bag
Most Dirt Devils have a removable dust cup, sometimes with a filter inside. Pop that sucker out and dump any dust into the trash. If it’s a bag model, gently take the bag out—don’t rip it, or you’ll be inhaling a cloud of dust that feels like a sandstorm.
Step 2: Unscrew the Bottom Plate
Flip your vacuum over. You’ll see a plate covering the brush roll. Unscrew all the screws; keep ‘em in your little bowl or something. Some models hide screws under little stickers or rubber pads—don’t freak out if you can’t see ‘em right away.
Step 3: Pull Out the Brush Roll
Once the bottom plate is off, the brush roll should slide out fairly easily. Sometimes it’s a bit snug, especially if hair has wound around the ends. Use your needle-nose pliers to carefully pull out any tangled stuff. This is often where the suction problem starts.
Step 4: Detach the Belt
Dirt Devil vacuums usually have a belt connecting the brush roll to the motor. Take a mental note of how it’s routed or snap a quick photo on your phone before you remove it—believe me, putting it back wrong is a nightmare. Gently slip the belt off the brush roll and motor pulley.
Step 5: Access the Motor Compartment
Here’s where it gets slightly trickier. Some models let you remove the entire front housing by unscrewing a few screws, others might have clips that require a little finesse with a flat-head screwdriver. Slowly wiggle the panels; never force anything. The motor’s usually sitting in the middle, connected with two wires—make sure you don’t yank those out.
Step 6: Clean or Replace Parts
Now you’re at the heart of the vacuum. Take a microfiber cloth or a small brush and remove dust and debris from the motor, fan blades, and inner panels. Check the belt for cracks—if it’s worn, replace it. The brush roll bearings might also need a quick squirt of silicone lubricant if they’re squeaky. This step alone can make your vacuum feel brand new.
Step 7: Reassemble Carefully
Put everything back in reverse order. Slide the belt onto the motor pulley first, then the brush roll, then the bottom plate. Screw everything back, replace the dust cup or bag, plug it in, and give it a test run. If it’s still weirdly noisy, double-check for anything trapped inside.
Common Mistakes People Make
- Forcing Panels – Dirt Devil housings click together in a specific way. Forcing them can crack the plastic.
- Losing Screws – Seriously, keep a bowl or small container. One missing screw can throw off the balance.
- Not Checking the Belt – A worn belt will make your vacuum feel dead even if the motor’s fine.
- Skipping the Motor Clean – Dust on the motor reduces suction and can eventually burn it out.
A quick tip: if your vacuum is over 5 years old, some parts might be brittle. Handle with care and consider replacements instead of just cleaning.
Real-World Examples
I once had a Dirt Devil Vision upright that had completely lost suction. I thought it was the motor dying. Turns out, a single sock had somehow made it into the hose and was blocking airflow. Took me ten minutes to get inside, remove it, and voila—the vacuum was humming like new. Another friend had a SD2000 model, belt snapped after years of hair accumulation. Replacing it cost $8 online, and the vacuum worked for another 3 years. Stuff like this proves you don’t always need a new vacuum.
Maintenance Tips Post-Disassembly
- Clean Filters Regularly – A clogged filter makes all that cleaning useless.
- Check the Belt Every Few Months – Keeps the brush roll spinning properly.
- Avoid Wet Debris – Dirt Devils aren’t usually designed for wet vacuuming.
- Store Properly – Keep it upright in a dry area to prevent plastic warping.
Safety First
Never try to take apart your vacuum while it’s plugged in. Even if you’re just “peeking,” that tiny shock isn’t worth it. Wear gloves if you’re dealing with caked-on gunk, and if anything looks burnt or melted inside, consider professional service.
Conclusion
Taking apart a Dirt Devil vacuum cleaner can seem intimidating at first, but once you get the hang of the panels, screws, and belts, it’s actually pretty straightforward. With the right tools, a little patience, and careful observation, you can clean, maintain, and even fix most issues yourself. Not only will it save you money, but you’ll also get that strange satisfaction of actually knowing what’s going on inside your vacuum. So next time it’s acting up, don’t reach for a new one—get inside, take it apart, and fix it like a pro.
If you follow this guide, you’ll see that your Dirt Devil isn’t some mystical appliance—it’s just a cleverly disguised collection of screws, belts, and dust that’s totally manageable once you know how. And honestly, once you’ve done it once, future maintenance is basically a walk in the park.
Would you like me to also create a table of step-by-step actions for quick reference? It can make the disassembly process way easier.